
The main interface of Slide Effect is composed of several elements:
- The toolbar and menu: there you go to the main actions, like adding a new slide or save your presentation.
- The selection of the slide (left): this part displays thumbnails of each slide and selects the active slide. Moreover, using the right mouse button, you have access to a menu that allows you to do various actions on the slides, such as duplicate or change the order.
- The Main tab: In this tab you will build each slide, adding and changing elements.
- The Background tab: In this tab you choose the background picture/movie of the current slide.
- The Transition tab: In this tab you select a transition used to go to the next slide.
- The Audio tab: Here you can add music or commentary to the current slide or the entire presentation.
- The Filter tab: In this tab you choose a filter that will be applied to the slide.
New Presentation
Creates a new presentation. The previous presentation will be closed, be sure to save your changes.
Open Presentation
Opens a previously saved presentation on the hard disk.
Save Presentation
Saves changes of the current presentation. If no name was given to the presentation, a window appears allowing you to choose the name of the presentation. When the presentation was modified without being saved, an asterisk is added to the file name in the title bar. This lets you know in a glance if the latest changes were saved.
Add Slide
Allows you to insert a slide after the current slide. A window appears and allows you to choose a predefined slide. However, the slide can be completely changed after this operation.
Remove Slide
Deletes the currently selected slide.
This can also be done by right clicking on a slide thumbnail and by selecting Delete this slide from the contextual menu.
Move Slide Up
Move the currently selected slide up the list to change the order of appearance. Obviously, if you select the first slide, this option will be grayed out.
This can also be done by right clicking on a slide thumbnail and by selecting Move Slide Up from the contextual menu.
Move Slide Down
Move the currently selected slide down the list to change the order of appearance. Obviously, if you select the last slide, this option will be grayed out.
This can also be done by right clicking on a slide thumbnail and by selecting Move Slide Down from the contextual menu.
Preview Presentation
Display in a small window the currently selected slide with all animations.
Play Presentation
Display the full presentation in full-screen.
Notice
If you want to resume interrupted presentation to a slide in particular, then select the slide in question and use the menu Project/ Preview Presentation (Full screen) or press F4.Help
Displays online help
File menu
New … Create a new presentation. The previous presentation will be closed, be sure to save your changes. (Hotkey: Ctrl + N)
Open … Opens a previously saved presentation on the hard disk. (Hotkey: Ctrl + O)
Merge Presentations… (Professional Edition only) allows you to merge another presentation to the one currently open. (Shortcut: none)
Save … Saves the presentation. (Keyboard shortcut: Ctrl-S)
Save As … Saves the presentation under a new name. (Shortcut: none)
Print … To print the slides of the presentation. (Shortcut: none)
Create Standalone Presentation … Allows to export the presentation as a standalone executable. (Shortcut: none)
Create movie from Presentation … Allows to export the presentation as a video. (Shortcut: none)
Import pictures in batch … Allows you to import an image directory into the presentation. (Shortcut: none)
Recently used files Last 4 open presentations are listed in order to access them quickly. (Shortcut: none)
Exit To close the application. (Shortcut: none)
Edit Menu
Undo to cancel the last changes. (Hotkey: Ctrl + Z)
Redo To restore the last action. (Hotkey: Ctrl + Y)
Project menu
Preview Presentation To preview the current slide in real conditions (with all the animations). (Keyboard shortcut: F5)
Preview Presentation (Full Screen) To see the presentation in full screen from the current slide. Unlike the standard preview, the presentation will be played from the current slide to the end (this allows to resume interrupted presentations). (Hotkey: F4)
Play full presentation to see the full presentation in full screen. (Hotkey: F6)
Settings … to display various parameters of the currently open presentation. (Shortcut: F10)
Tools menu
Set Random Transitions… assigns to each slide a random transition. (Shortcut: none)
Effect editor… (Professional Version only) to open the effects/filters/transitions editor
Notes (Professional Version only) To add notes to a slide. These notes can be printed or displayed when the presentation is running. (Shortcut: none)
Options … General program options. For more information, please read the following chapter: Software Options. (Shortcut: F10)
Help menu
Help … To open the Help file. (Hotkey: F1)
Visit Slide Effect Website… opens the Slide Effect site in your browser. (Shortcut: none)
Download more Backgrounds online. To download additional backgrounds from our website. (Shortcut: none)
Download more Effects/transitions online. To download additional transitions/effects/filters from our website. (Shortcut: none)
About … To learn more about the application, particularly the version number. (Shortcut: none)
 This part of the interface is used to browse the slides of the presentation. Just click on the slide you want and it will appear in the main view for editing.
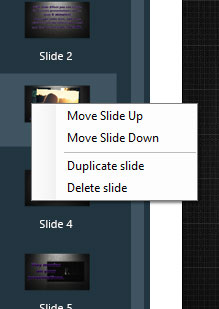
If you right click on a slide, a contextual menu appears. It offers the following options (some may be grayed out depending on circumstances):
Move Slide Up to move the slide one step up in the list. This can also be made ‹with the Move Slide Up toolbar button.
Move Slide Down to move the slide one step down in the list. This can also be made with the Move Slide Down toolbar button.
Duplicate this slide To make a copy of the current slide. This copy will be added after the current slide.
Delete this slide Deletes the current slide.
Notice
To quickly browse the slides, you can use the Page Up and Page Down keys on the keyboard.
 The Main tab allows you to truly build the slide. It allows you to edit, add or remove items from slide. It consists of the following main elements:
The total duration of the presentation (1)
This is the entire duration of the full presentation. If the duration is not displayed, it is because the presentation contains at least one slide without a fixed time (On mouse/keyboard click)
The selected item (2)
The currently selected item is surrounded by a red frame. To select an item, simply click on it.
Items available (3)
This is the list of elements you can add to the slide (text, image, video ,…). Simply click or drag and drop one of these elements to add it to the current slide.
Delete Button (4)
Click this button to delete the currently selected item. You can also press the DEL key on your keyboard.
Settings for advancement of the slide (5)
Here you can choose the display time of each slide and the way it will go to the next (after a click, automatically after a certain time or both).
Properties of the selected object (6)
This section displays the properties of the selected object. In this part of the interface you can choose exactly all the settings for each object (animation effects, color, etc. …)
You can add several elements on slides. They can be one of seven types:
To add images or pictures. Images with a transparent background (png or gif) are accepted. Just double-click on the image to change.
To add videos or movies. When importing, you will be asked if you want to import the soundtrack or not, then the video will be converted and displayed as a thumbnail.
Plain text: to add standard text
3D Text: to add 3D rendered text
3D Cube: To add a 3D cube that can display a photo per side (6 sides)
A countdown
A 3D text countdown.
To add objects to the slide you can proceed in two ways:
Use the shortcut bar at the bottom
This is the easiest way and the one you use primarily. Just click on the icon corresponding to the object you want to see appear in the center of the slide. You can then modify it according to your wishes.
Drag and drop items from Windows
You can also open a standard Windows Explorer, select one or more images (or videos) and move them to the slide you want.
Similarly, you can select other objects in other applications (text, Excel charts, etc …) and place it directly on the target slide.
Notice
When you select multiple images and you put them down on a slide, they are all added to the current slide. If you want to create a new slide by photo, then use this feature: import a folder of images automatically .

You can do 3 basic changes directly on the object with the mouse:
Change the position of an object: Just press the left mouse button on the selected object and then move it where you want and finally release the mouse button.
Change the size of an object: Just press the left mouse button on the resize handle in the bottom right of the selected object, then move the mouse to resize and finally release the mouse button.
Rotate an object: Just press the left mouse button on the rotation handle at the bottom left of the selected object, then move the mouse to rotate the object and finally release the mouse button .
Notice
To rotate by 45° step, press the Shift key when you perform the rotation. To change text size, simply use the resize handle. It is not necessary to choose the size of the font as such.Contextual Menu
Clicking the right mouse button on a selected object will display a contextual menu. This menu allows you to do various operations on the selected object:
- Bring To Front
- Send To Back
- Delete Selected Object
- Rotate it to a preset angle
- Resize it to a preset size
- Basic editing operations (copy / cut / paste)
If you right click on no objects, a menu will appear allowing you to paste a possible item in the clipboard.
When you click an object, properties of this object are displayed on the right of the window. These properties depend on the type of object selected, but they generally fall into three categories.
General
This section displays the general property of the object.
Effects (start/end/animation)
In this section you will choose the effects you want applied to the object. These effects are divided into several parameters:
- Start Effect: it is the effect to be applied to show the object.
- End effect: this effect will be applied when hiding the object. This effect will only be displayed if you select a display time for this object to something other than infinite (in Time Settings section). It will not be automatically applied when switching to the next slide.
- Animation: it’s an animation effect to be applied to the object during the time it is displayed.
Time Settings
This part is common to all elements. It allows you to choose when and how the item will appear.
With the Display: parameter, you choose when or how the item will appear. You can either display it after a delay (the time since the current slide is displayed) or you may decide it will appear when you click (On Click) the mouse (or press on the keyboard). In this case you can also choose the order of appearance (useful when several elements appear “On Click”).
With the Duration: setting, you select the display time of the object. The default is infinite and the default will be displayed until the slide is changed. If you uncheck infinite, then you can choose a display period.
In the upper right you will find the settings to choose how to advance to the next slide. 2 modes are available:
On mouse/keyboard click
If you select this mode, the slide will change when you press one of the following buttons:
- Space bar
- Return key (Enter)
- Right arrow key
- Down arrow key
- Page Down key
- Left mouse click
In this mode you can also go back by using one of the following key:
- Left arrow key
- Top arrow key
- Page Up key
Automatically after
In this mode, you can choose to move to next slide after a specified time. It is the function used, for example, when you want to create a video with your presentation.
Notice
Note: It is quite possible to activate the two modes simultaneously. In this case, the first satisfied condition will trigger the transition. If you use a Powerpoint remote control to scroll through slides, in most cases they are compatible, as they simulate pressing the Page Up / Page Down.

The music tab is used to add music or talkover to the presentation.
Just select the slide where you want to add music, then click on + Add a new music/audio file starting from this slide.
Once you have selected the file, you will see a window like this one.
This window will be displayed also on following slides, but with less options: it is useful to change the volume or pause the music on one particular slide.
This window has the following options:
- General volume: the main volume of this file
- Slide volume: volume for this particular slide
- Pause: to pause the music
- Stop: to stop the music
- Crossfade: add a fade-in, fade-out to the music
- Loop: To restart the music when at the end
- 1 slide: This music is only for this slide.
The project settings are available using the Project/Settings … menu. Two tabs are available:
Global Tab
In this tab you have 1 parameter:
- When Slide show is at the end: you can choose whether the presentation will start from the beginning, or, conversely, stop.
Screen Ratio Tab
In this tab, you choose the format of the currently open presentation. Several choices are available:
- Automatic: This is the default mode, the presentation will best suit the screen size available.
- 4/3: The presentation format will be played in 4 / 3, as a “legacy” screen.
- 16/10: The presentation format will be played in 16/10. This is the format of some computer monitors.
- 16/9: The presentation format will be played in 16 / 9. This is the format of new televisions.
- Custom: (For advanced users) you can enter yourself the relationship between the width and height.
Notice
Project settings only affect the currently open project, unlike the menu option: Tools/Options that affect the software settings in general
Software options are available using the Tools/Options… menu and are organized in 4 tabs:
Movies Tab
In this tab you have a single parameter:
- Bitrate: changing this setting you can change the bitrate used when importing video into the presentation. If you increase the video quality will be better, but the file size will be increased too. Resulting in a bigger project file (*. SEF). This is an advanced option.
Interface Tab
In this tab you have 3 parameters:
- Language: This setting determines the language of the interface. By default it is set to “Automatic”, which means that the interface adapts to the user environment (to the extent possible).
- Open sample presentation on start: Unchecking this will prevent automatic opening of the sample at start.
- Main tab high quality preview: Please uncheck this if you have a presentation with a lot of objects on each slide and you see slowdowns.
Player Options Tab
In this tab you have 1 parameter:
- Play presentation on screen: To select on which screen the presentation will be displayed.
Default Screen Ratio Tab
In this tab, you choose the default format used by a new presentation. Several choices are available:
- Automatic: This is the default mode, the presentation will best suit the screen size available.
- 4/3: The presentation format will be played in 4 / 3, as a “legacy” screen.
- 16/10: The presentation format will be played in 16/10. This is the format of some computer monitors.
- 16/9: The presentation format will be played in 16 / 9. This is the format of new televisions.
- Custom: (For advanced users) you can enter yourself the relationship between the width and height.
Notice
This “Default Screen Ratio” is only used for new presentations. If you want to change the ratio of a particular presentation, then use the Project/Settings…. menu.
Files
- Ctrl-N New Presentation
- Ctrl-O Open a presentation
- Ctrl-S Save a presentation
Edition
- Ctrl-Z Undo last operation
- Ctrl-Y Redo last operation
Navigation
- Page Up Previous Slide
- Page Down Next slide
Miscellaneous
- F1 Help
- F4 Preview (full screen – from current slide to the end of the presentation)
- F5 Preview (Window – current slide)
- F6 Play presentation (full screen – complete presentation)
- F10 Presentation Settings
- Del Delete the selected object
- Esc Close the preview window
When the presentation is running
- Space, Return, right arrow, down arrow, Page Down, left mouse click Next Slide
- Left arrow, up arrow, Page Up Previous Slide
- P Pause
- R Restart Presentation
- F Fade to black and pause
How to add my own images to the presentation?
Just click on the picture icon on the bottom of the main area.
Then, on the work area, double-click on the picture to select which photo you want to use from your collection.
Notice
You can also simply drag photos from the desktop or any other window to the work area of Slide Effect to add the pictures to the banner.
How can I use part of a presentation in another one?
Please proceed as follows:
- Open the first presentation in Slide Effect
- Select the slide after which you want to insert another presentation, or part of.
- Use the File/Merge Presentations… menu and choose another presentation
- Once the merge is done, simply delete the slides that are not necessary.
Is it possible to change the font when using 3D characters?
No. Only one font is currently available for 3D text. However you can change its appearance by changing the color and material of the text.
How to assign a random transition between each slides?
Just use the Tools/Set random transitions menu.
This operation will assign a transition randomly selected for each of the slides. Then feel free to modify these transitions so that they better suit your requirements.
How can I duplicate a slide?
- Select the slide you want.
- In the left thumbnails, right click to open the contextual menu.
- Choose Duplicate this slide.
Is it possible to create a PDF presentation?
If you want to create a PDF file from a presentation, the easiest is to use tools like Cute PDF Writer. With these tools you can print presentation to a PDF file.
How to keep music volume decreases slowly (Fade Out) at the end of the presentation?
- On the first slide, go to the Audio tab, choose a music.
- Check crossfade option.
- Select last slide of the presentation.
- On Audio tab, press Pause.
Thus, the music starts on the first slide, then continue to be played until it encounters the command “Pause” from the last slide and then decrease in volume until it stops (Fade Out).
How can I change the language of the user interface?
By default, the language is adapted to the user environment (if the translation is available of course).
If you want to force this setting, for example because you are working on a computer configured in the English language but want to have a French interface, just use the menu Tools/Options …, Interface tab, and change the language from “Automatic” to the desired language.
How to play the presentations on the 2nd screen?
It is possible to play presentations on any screen, simply go to the Tools/Options… menu, select the Player Options tab and choose the needed screen.
Is it possible to play the presentation in full screen from a slide in particular?
Yes, of course.
Just select the slide you want, then use the Project/ Preview Presentation (Full Screen) menu (or press F4): The presentation will play from the selected slide until the end.